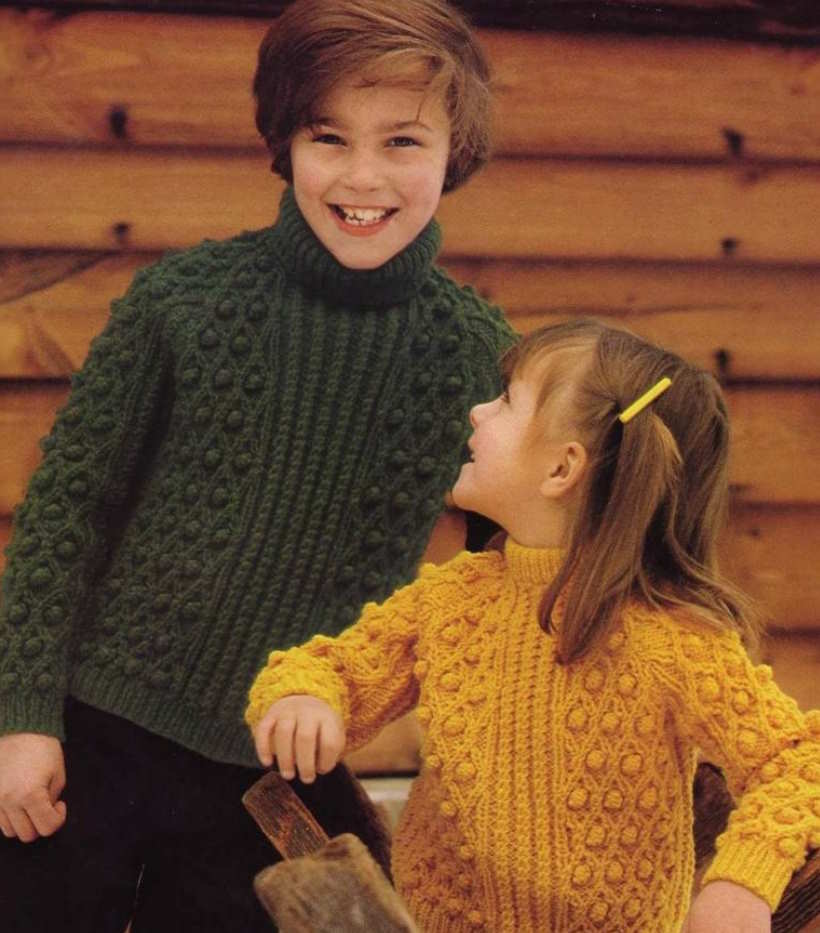
Knit a cozy and stylish Aran sweater for your child with this classic pattern! Featuring a charming combination of lattice and bobble stitches, this sweater offers both visual appeal and chunky warmth. The pattern includes options for both a polo neck and a round neck, making it versatile for different preferences. Sized to fit chests from 24-31 inches (approximately 2-10 years), this sweater is a rewarding project for intermediate knitters. The textured design is worked in a worsted weight yarn for durability and comfort.
Sizes:
- To Fit Chest: 24-25 [26-27, 28-29, 30-31] inches / 61-63 [66-69, 71-74, 76-79] cm
- Approximate Ages: 2-3 [4-5, 6-7, 8-10] years. (Note: This is a rough estimate. Always measure the child.)
- Length from Top of Shoulders: 15 [16.5, 18, 19.5] inches / 38 [42, 46, 49] cm
- Sleeve Seam: 10.5 [12, 13.5, 15] inches / 27 [30, 34, 38] cm
Materials:
- Yarn: Patons Capstan (Worsted Weight / Yarn Group C) Note: This yarn may be discontinued. Choose a substitute worsted weight yarn that achieves the correct gauge.
- Round Neck: 8 [9, 11, 13] x 50g balls.
- Polo Neck: 8 [9, 12, 14] x 50g balls.
- Needles:
- One pair 3.25mm needles (US size 3 / UK size 10) – Smaller Needles
- One pair 4.5mm needles (US size 7 / UK size 7) – Larger Needles
- Stitch holders
- Safety Pin
Abbreviations:
- K: Knit
- P: Purl
- St(s): Stitch(es)
- Rep: Repeat
- Beg: Beginning
- K2tog: Knit two stitches together (a decrease)
- St st: Stockinette stitch (Knit on RS, Purl on WS)
- Rem: Remain/Remaining
- RS: Right side
- WS: Wrong side
- Sl: Slip
- Patt: Pattern
- Psso: Pass slipped stitch over
- M1: Make 1 stitch – Pick up the horizontal loop lying before the next stitch and knit into the back of it (this creates a relatively invisible increase).
- Cr2L: Cross 2 Left – Purl into the back of the 2nd stitch on the left needle, then knit into the front of the first stitch, slipping both stitches off the needle together.
- Cr2R: Cross 2 Right – Knit into the front of the 2nd stitch on the left needle, then purl into the front of the first stitch, slipping both stitches off the needle together.
- Tw2: Twist 2 – Knit into the front of the 2nd stitch on the left needle, then knit into the front of the first stitch, and slip both stitches off the needle together.
- MB: Make Bobble – Pick up the horizontal loop lying before the next stitch and work into it as follows: (K1, P1) twice, turn, K4, turn, P4, slip the 2nd, 3rd, and 4th stitches over the first stitch, then slip the first stitch back onto the left needle.
Tension (Gauge):
- 9 sts and 12 rows = 2 inches (5 cm) measured over stockinette stitch on 4.5mm (US 7) needles. Checking your gauge is crucial for a well-fitting garment.
Pattern Notes:
- The pattern uses UK terminology for increases (M1) and decreases.
- The cable stitches (Cr2L, Cr2R, Tw2) are worked over two stitches.
- The bobble (MB) is worked over one stitch.
Instructions:
Back:
- Cast On: With 3.25mm (US 3) needles, cast on 60 [64, 68, 72] sts.
- Ribbing: Work in K1, P1 rib for 1.5 inches.
- Increase Row:
- Rib 4 [1, 2, 6], M1, rib 3 [3, 3, 2], M1, * rib 3 [3, 2, 2], M1; rep from * to the last 8 [3, 6, 10] sts, rib 3 [1, 3, 5], M1, rib 5 [2, 3, 5]. (66 [72, 78, 84] sts) Note: There appears to be an error in the original pattern. I’ve adjusted to match the listed stitch count
- Change to Larger Needles: Change to 4.5mm (US 7) needles.
- Begin Pattern:
- Row 1 (RS): P2, (Tw2, P2) 1 [2, 2, 3] times, Tw2, * (P4, Tw2) 4 times, P2, (Tw2, P2) 3 [3, 5, 5] times; rep from * to last set of stitches, P2, (Tw2, P2) 1 [2, 2, 3] times.
- Row 2: K2, (P2, K2) 1 [2, 2, 3] times, P2, * (K4, P2) 4 times, K2, (P2, K2) 3 [3, 5, 5] times; rep from * to last set of stitches, K2, (P2, K2) 1 [2, 2, 3] times.
- Row 3: P2, (Tw2, P2) 1 [2, 2, 3] times, Tw2, * (P2, MB, P2tog, P1, Tw2) 4 times, P2, (Tw2, P2) 3 [3, 5, 5] times; rep from * to last set of stitches, P2, (Tw2, P2) 1 [2, 2, 3] times.
- Row 4: As Row 2.
- Row 5: P2, (Tw2, P2) 1 [2, 2, 3] times, K1, * (Cr2L, P2, Cr2R) 4 times, K1, P2, (Tw2, P2) 3 [3, 5, 5] times; rep from * to last set of stitches, P2, (Tw2, P2) 1 [2, 2, 3] times.
- Row 6: K2, (P2, K2) 1 [2, 2, 3] times, P1, * (K1, P1, K2, P1, K1) 4 times, P1, K2, (P2, K2) 3 [3, 5, 5] times; rep from * to last set of stitches, K2, (P2, K2) 1 [2, 2, 3] times.
- Row 7: P2, (Tw2, P2) 1 [2, 2, 3] times, K1, * (P1, Cr2L, Cr2R, P1) 4 times, K1, P2, (Tw2, P2) 3 [3, 5, 5] times; rep from * to last set of stitches, P2, (Tw2, P2) 1 [2, 2, 3] times.
- Row 8: K2, (P2, K2) 1 [2, 2, 3] times, P1, * (K2, P2, K2) 4 times, P1, K2, (P2, K2) 3 [3, 5, 5] times; rep from * to last set of stitches, K2, (P2, K2) 1 [2, 2, 3] times.
- Row 9: P2, (Tw2, P2) 1 [2, 2, 3] times, K1, * (P2, Tw2, P2) 4 times, K1, P2, (Tw2, P2) 3 [3, 5, 5] times; rep from * to last set of stitches, P2, (Tw2, P2) 1 [2, 2, 3] times.
- Row 10: As Row 8.
- Row 11: P2, (Tw2, P2) 1 [2, 2, 3] times, K1, P2, Tw2, * (P2, MB, P2tog, P1, Tw2) 3 times, P2, K1, P2, (Tw2, P2) 3 [3, 5, 5] times; rep from * to last set of stitches, P2, (Tw2, P2) 1 [2, 2, 3] times.
- Row 12: As Row 8.
- Row 13: P2, (Tw2, P2) 1 [2, 2, 3] times, K1, * (P1, Cr2R, Cr2L, P1) 4 times, K1, P2, (Tw2, P2) 3 [3, 5, 5] times; rep from * to last set of stitches, P2, (Tw2, P2) 1 [2, 2, 3] times.
- Row 14: As Row 6.
- Row 15: P2, (Tw2, P2) 1 [2, 2, 3] times, K1, * (Cr2R, P2, Cr2L) 4 times, K1, P2, (Tw2, P2) 3 [3, 5, 5] times; rep from * to last set of stitches, P2, (Tw2, P2) 1 [2, 2, 3] times.
- Row 16: As Row 2.These 16 rows form the pattern.
- Continue in Pattern: Work straight in pattern until the Back measures 8.5 [9.5, 10.5, 11.5] inches from the cast-on edge, ending with a RS row ready for the next row.
- Shape Raglans:
- Cast off 3 sts at the beg of the next 2 rows.
- Dec 1 st at each end of every row until 60 [64, 68, 72] sts remain.
- Now dec 1 st at each end of the next and every alt row until 24 [26, 28, 30] sts remain, ending with a RS row.
- Leave Stitches: Leave the remaining 24 [26, 28, 30] sts on a spare needle (stitch holder).
Front:
- Work as for Back: Work as for the Back until 36 [40, 44, 48] sts remain in the raglan shaping, ending with a RS row.
- Divide for Neck:
- Next Row: K2tog, patt 11 [12, 13, 14], turn, and leave the remaining stitches on a spare needle.
- First Side of Neck:
- Continue on these stitches for the first side.
- Dec 1 st at the raglan edge on every following alt row, at the same time dec 1 st at the neck edge on every row until 5 [6, 7, 8] sts remain.
- Keeping the neck edge straight, continue decreasing at the raglan edge only as before until 2 sts remain.
- Next Row: P2.
- Next Row: K2tog and fasten off.
- Second Side of Neck:
- With the RS facing, slip the center 10 [12, 14, 16] sts onto a spare needle (stitch holder).
- Rejoin the yarn to the remaining stitches, patt to the last 2 sts, k2tog.
- Complete to correspond with the first side, reversing the shaping.
Sleeves (Make Two):
- Cast On: With 3.25mm (US 3) needles, cast on 32 [36, 36, 40] sts.
- Ribbing: Work in K1, P1 rib for 1.5 inches.
- Increase Row:
- Rib 3 [4, 4, 7], M1, * rib 5 [3, 3, 2], M1; rep from * to the last 4 [5, 5, 7] sts, rib 4 [5, 5, 7]. (38 [44, 44, 50] sts) I have corrected what appears to be another error to get to the desired number of stitches.
- Change to Larger Needles: Change to 4.5mm (US 7) needles.
- Begin Pattern:
- Row 1: P2, (Tw2, P2) 1 [2, 2, 3] times, work from * to * as on the first pattern row of the Back across the next 26 sts, P2, (Tw2, P2) 1 [2, 2, 3] times.
- Row 2: K2, (P2, K2) 1 [2, 2, 3] times, work from * to * as on the 2nd pattern row of the Back across the next 26 sts, K2, (P2, K2) 1 [2, 2, 3] times.
- Continue in this way, working the 26 center stitches in pattern and working the appropriate pattern rows as for the Back from * to *, shaping the sides as follows:
- Shape Sleeve:
- Inc 1 st at each end of the 3rd [next, 9th, next] and every following 6th [8th, 8th, 10th] row until there are 54 [62, 62, 70] sts, taking the increased stitches into the twisted rib pattern.
- Work Straight: Work straight until the sleeve seam measures 10.5 [12, 13.5, 15] inches, ending with a RS row ready for the next row.
- Shape Raglans:
- Cast off 3 sts at the beg of the next 2 rows.
- Dec 1 st at each end of every row until 44 [44, 52, 52] sts remain.
- Now dec 1 st at each end of the next and every alt row until 4 sts remain, ending with a RS row.
- Leave Stitches: Leave the remaining 4 sts on a safety pin.
Making Up (Polo Neck or Round Neck):
- Block (Optional but Recommended): With the wrong side of the work facing, block each piece by pinning it out to the correct measurements (omitting the ribbing). Press lightly, following the instructions on the yarn ball band.
- Join Raglans: Using a flat seam for the ribbing and a fine backstitch seam for the remainder, join the raglan seams, leaving the left back raglan open.
- Polo Neck:
- With the RS facing and 3.25mm (US 3) needles, start at the top of the left sleeve.
- Work as follows: K the 4 sleeve sts, pick up and knit 12 [13, 14, 15] sts down the left side of the neck, K the 10 [12, 14, 16] sts from the center front stitch holder, pick up and knit 12 [13, 14, 15] sts up the right side of the neck, K the 4 sleeve sts, then K the 24 [26, 28, 30] sts from the back stitch holder. (66 [72, 78, 84] sts)
- Work in K1, P1 rib for 3.5 [4, 4, 4.5] inches.
- Cast off loosely in rib.
- Join the remaining raglan seam and the Polo Neck seam.
- Round Neck:
- Work as for the Polo Neck until the ribbing measures 2 [2.25, 2.75, 3] inches.
- Cast off loosely in rib.
- Fold the Round Neck in half to the WS and slip stitch it loosely in position.
- Join Side and Sleeve Seams: Join the side seams and sleeve seams.
- Press Seams: Press the seams lightly.
Reformatted vintage pattern to make it easier to read and follow. I’ve also added some notes to improve clarity where the original pattern might be ambiguous. Find the original pattern: here