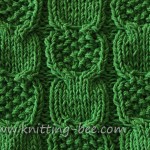
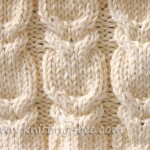
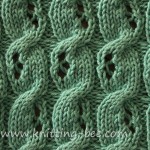
Free Knitting Stith for Chinese Lantern. The Chinese Lantern stitch is a beautiful, textured knitting pattern that creates a fabric with a unique, almost woven appearance. It’s named for the resemblance of the raised, elongated stitches to the shape of traditional Chinese lanterns.
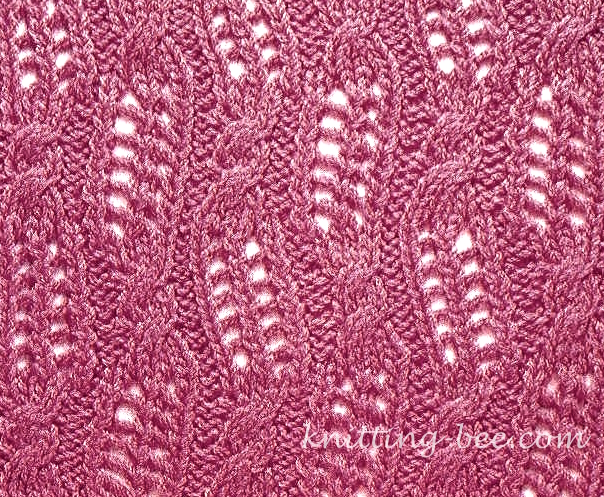
This Chinese Lantern stitch pattern is a beautiful and intricate design that combines various knitting techniques to create a highly textured, almost sculptural fabric. It’s an excellent choice for experienced knitters looking for a challenging and rewarding project. The resulting fabric would be stunning for scarves, shawls, or even panels in a sweater or blanket, where the detailed texture can be showcased. It’s a testament to how combining simple techniques in a clever way can produce extraordinary results in knitting.
Abbreviations:
- k: Knit – The most basic knitting stitch.
- p: Purl – The inverse of the knit stitch.
- rep: Repeat – Indicates that you should repeat the instructions that follow, usually from a specific point (often marked with an asterisk *).
- st(s): Stitch(es) – Refers to the loops on your needles.
- yo: Yarn Over – Bring the yarn forward between the needles (as if to purl, if you’re on a knit row), then over the right-hand needle to the back (as if to knit, if you are on a knit row). This creates an extra loop (a new stitch) and a small hole.
- k2tog: Knit Two Together – Insert the right-hand needle into the next two stitches on the left-hand needle as if to knit, and knit them together as one stitch. This is a right-leaning decrease (reduces the stitch count by one).
- sl: Slip – Move a stitch from the left-hand needle to the right-hand needle without working it (usually purlwise, unless otherwise specified).
- psso: Pass Slipped Stitch Over – After slipping a stitch and knitting the next stitch, use the left-hand needle to lift the slipped stitch up and over the stitch you just knitted, and off the needle. This is a decrease (reduces the stitch count by one).
- sl 1, k1, psso: Slip 1, Knit 1, Pass Slipped Stitch Over – This is a three-step sequence that results in a left-leaning decrease. It’s a common alternative to k2tog.
- cn: Cable Needle – A short, double-pointed needle used to hold stitches temporarily while working cable stitches.
- sl next 2 sts to cn and hold at back: Slip the next 2 stitches purlwise, move these stitches to the cable neelde, place that cable needle behind your working need.
- * … ;: The instructions between the asterisk and the semicolon are repeated.
- WS: Wrong Side. The side of the project that typically faces away from the knitter as they’re working. It’s often the “back” of the finished piece.
- RS: Right Side. The correct or visable side of the fabric.
Cast On:
Multiple of 13 sts plus 2.
Pattern Directions:
Row 1 (WS): K2, *p5, k1, p5, k2; rep from *.
Row 2: P2, *k1, (yo, k2 tog) twice, p1, k5, p2; rep from *.
Rows 3 and 5: K2, *p4, k2, p5, k2; rep from *.
Row 4: P2, *k1, (yo, k2 tog) twice, p2, k4, p2; rep from *.
Row 6: P2, *k1, (yo, k2 tog) twice, p2, sl next 2 sts to cn and hold at back, k2, then k2 from cn, p2; rep from *.
Rows 7, 8, 9, 10, 11 and 12: Repeat rows 3, 4, 5 and 6, then repeat rows 3 and 4 again.
Row 13: Repeat row 1.
Row 14: P2, *k5, p1, (sl 1, kı, psso, yo) twice, k1, p2; rep from *.
Rows 15 and 17: K2, *p5, k2, p4, k2; rep from *.
Row 16: P2, *k4, p2, (sl 1, k1, psso, yo) twice, k1, p2; rep from *.
Row 18: P2, *sl next 2 sts to cn and hold at back, k2, then k2 from cn; p2, (sl 1, k1, psso, yo) twice, k1, p2; rep from *.
Rows 19, 20, 21, 22, 23 and 24: Repeat rows 15, 16, 17 and 18, then rows 15 and 16 again.
Repeat rows I to 24.